Ubuntu12.04 VPSサーバ構築手順:CI環境構築 Playframework1.2アプリケーション構築
以下のエントリシリーズのうちの1つ:CI対象となるプロジェクトの作成について。まずはPlayframework1.2ベースのアプリから。
Play1.2実行環境構築
$ pwd
/Application
$ wget http://download.playframework.org/releases/play-1.2.5.zip
$ unzip play-1.2.5.zip
$ sudo vi /Users/XXX/.bash_profile
-----------------------------
##########################
# add Playframework env.
##########################
PLAY_HOME=/Applications/play-1.2.5
#PLAY_HOME=/Applications/play-2.0.4
export PLAY_HOME
export PATH=$PATH:$PLAY_HOME
-----------------------------
$ source /Users/XXX/.bash_profile
- 導入確認(play -v)。
$ play -v
~        _            _
~  _ __ | | __ _ _  _| |
~ | '_ \| |/ _' | || |_|
~ |  __/|_|\____|\__ (_)
~ |_|            |__/
~
~ play! 1.2.5, http://www.playframework.org
~
~ Usage: play cmd [app_path] [--options]
~
~ with,  new      Create a new application
~        run      Run the application in the current shell
~        help     Show play help
~
~ Invalid command: -v
~
$
- アプリケーション新規作成(play new アプリケーション名)
$ play new playfw12app
~        _            _
~  _ __ | | __ _ _  _| |
~ | '_ \| |/ _' | || |_|
~ |  __/|_|\____|\__ (_)
~ |_|            |__/
~
~ play! 1.2.5, http://www.playframework.org
~
~ The new application will be created in /Applications/eclipse4.2/workspace/playfw12app
~ What is the application name? [playfw12app]
~
~ OK, the application is created.
~ Start it with : play run playfw12app
~ Have fun!
~
$
- アプリケーション起動(play run アプリケーション名)
$ play run playfw12app/
~        _            _
~  _ __ | | __ _ _  _| |
~ | '_ \| |/ _' | || |_|
~ |  __/|_|\____|\__ (_)
~ |_|            |__/
~
~ play! 1.2.5, http://www.playframework.org
~
~ Ctrl+C to stop
~
CompilerOracle: exclude jregex/Pretokenizer.next
Listening for transport dt_socket at address: 8000
16:05:00,759 INFO  ~ Starting /Applications/eclipse4.2/workspace/playfw12app
16:05:01,614 WARN  ~ You're running Play! in DEV mode
16:05:01,761 INFO  ~ Listening for HTTP on port 9000 (Waiting a first request to start) ...
16:05:09,783 INFO  ~ Application 'playfw12app' is now started !
- http://localhost:9000/ でアクセス確認
$ play deps playfw12app/
$ play ec playfw12app/
Play1.2テスト実行
『play auto-test』で実行が可能。
初期状態でテストしてみる。(play auto-test アプリケーション名)
$ play auto-test playfw12app/
~        _            _
~  _ __ | | __ _ _  _| |
~ | '_ \| |/ _' | || |_|
~ |  __/|_|\____|\__ (_)
~ |_|            |__/
~
~ play! 1.2.5, http://www.playframework.org
~ framework ID is test
~
~ Running in test mode
~ Ctrl+C to stop
~
~ Deleting /Applications/eclipse4.2/workspace/playfw12app/tmp
~
CompilerOracle: exclude jregex/Pretokenizer
.next
Listening for transport dt_socket at address: 8000
16:56:44,939 INFO  ~ Starting /Applications/eclipse4.2/workspace/playfw12app
16:56:46,000 WARN  ~ You're running Play! in DEV mode
~
~ Go to http://localhost:9000/@tests to run the tests
~
~ 4 tests to run:
~
~ AnotherPlayUnitTest...     PASSED     1s
~ BasicTest...               PASSED     0s
~ ApplicationTest...         PASSED     0s
~ Application...             PASSED     5s
~
~ All tests passed
~
$
テスト実行結果は test-result/ フォルダに生成される。
$ pwd
/Applications/eclipse4.2/workspace/playfw12app/test-result
$
$ ll
AnotherPlayUnitTest.class.passed.html
Application.test.html.passed.html
ApplicationTest.class.passed.html
BasicTest.class.passed.html
TEST-BasicTest.xml
TEST-AnotherPlayUnitTest.xml
TEST-ApplicationTest.xml
application.log
result.passed
$
- 結果を開いてみたところ。テスト実行後の連携については別途Jenkinsプラグイン関連のエントリにて。
Ubuntu12.04 VPSサーバ構築手順:CI環境構築 アプリケーションをMercurialリポジトリに登録(from Eclipse)
以下のエントリシリーズのうちの1つ:任意のプロジェクトをMercurialプラグインを介してBitbucketに登録するまでのメモ。
- Eclipse Mercurialプラグインを事前にEclipseに入れておく。( 設定URL:http://cbes.javaforge.com/update )
- また、Bitbucketにアカウント及び対応するリポジトリを作成しておく。
- Eclipse上からMercurial連携及びプロジェクトをBitbucketにプッシュしていく。Eclipseを開きプロジェクトを右クリック→[チーム]→[プロジェクトの共用]→[Mercurial]を選択。
- Mercurial管理対象とするプロジェクトのパスを指定。
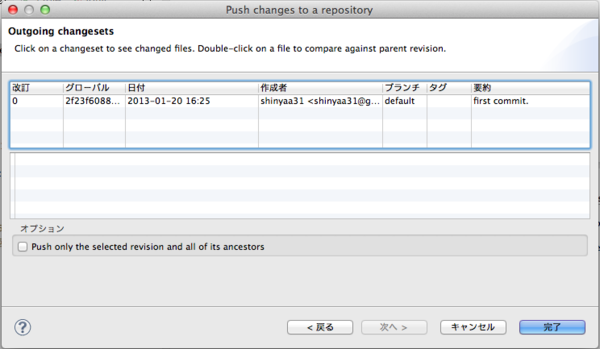
- プロジェクトのプッシュ。プロジェクトを右クリック→[チーム]→[プッシュ]を選択、プッシュ先のURL・ユーザ名・パスワードをそれぞれ入力し、[OK]押下。
- 内容を確認し、[OK]押下。
- 対象のBitbucketリポジトリにアクセスし、プッシュ内容を確認。
このエントリにはEclipseベースでのMercurial連携について書きましたが、IntelliJベースでのMercurial連携についても先日エントリにまとめました。以下エントリになりますのでこちらも良ければご参照ください。
Ubuntu12.04 VPSサーバ構築手順:CI環境構築 Jenkinsユーザのsudo処理有効化設定
以下のエントリシリーズのうちの1つ:Jenkinsで諸々の処理をお願いするにあたり、恐らく幾度と無く行わせる事になるであろう『sudo』絡みの処理及びその有効化設定について。
とある作業を試そうとしたらタイトルの問題にぶつかったのでメモ。
まずはJenkinsで適当なプロジェクトを作成、シェルでsudo実行するコマンドを設定してみる。
sudo echo 'Hello, Jenkins!'
- ビルド実行。これはエラーになる。
Started by user anonymous
Building in workspace /var/lib/jenkins/jobs/jenkins-sandbox/workspace
[workspace] $ /bin/sh -xe /tmp/hudson5043293891289983150.sh
+ sudo echo Hello, Jenkins!
sudo: no tty present and no askpass program specified
Sorry, try again.
sudo: no tty present and no askpass program specified
Sorry, try again.
sudo: no tty present and no askpass program specified
Sorry, try again.
sudo: 3 incorrect password attempts
Build step 'Execute shell' marked build as failure
Finished: FAILURE
- サーバにログインし、visudoコマンドでファイルに以下の内容を追記。(この内容は保存時点で有効になるようです)
$ sudo /usr/sbin/visudo
------------------------
# Defaults requiretty           # tty無しの場合sudoさせない
Defaults:jenkins !requiretty   # ユーザjenkinsはtty無しでsudo可能
jenkins ALL=(ALL) NOPASSWD:ALL # ユーザjenkinsはパスワード無しでsudo可能
- Jenkinsで先程のタスクを実行してみる。今度は問題無く実行出来ました。
Started by user anonymous
Building in workspace /var/lib/jenkins/jobs/jenkins-sandbox/workspace
[workspace] $ /bin/sh -xe /tmp/hudson1427784546581462640.sh
+ sudo echo Hello, Jenkins!
Hello, Jenkins!
Finished: SUCCESS
これで諸々の作業をJenkinsさんに存分にお任せ出来そうです。
参考:
今日のつぶやき 2013/01/27
- 俺の名はshinyaa31、通称ハンニバル。自慢の天才だ。天才でもぶん殴ってみせらぁ。でも、奇襲戦法だけは奇襲戦法な! #tyarou http://t.co/S768hdCD 最後おかしいがな(´・ω・`) posted at 23:50:10
- こんな勉強会に参加してました:(126) 2012/09/01(土) TDD Boot Camp 横浜 Second Seasonにスタッフとして参加してきた #tddbc http://t.co/kVMagm1o posted at 22:21:58
- #junitbook 2/2(土) 15:00〜19:00開催です! / 『JUnit実践入門』写経・実践会 in 横浜 #3 - connpass http://t.co/PSrF5acI posted at 21:39:23
- @masanobuimai さんにコメント頂いた内容を追記しました! / IntelliJ IDEA 12 x Mercurial x Bitbucket連携 - Shinya’s Daily Report http://t.co/fAjF2eTY posted at 21:23:30
- 特攻野郎Aチーム、一度DVDで観たけれど見入ってしまうねぇ。 posted at 21:20:43
- こんな勉強会に参加してました:(105) 2012/05/15(火) スマートフォンUXの最前線 に参加してきた #webcat http://t.co/Ujwr40RC posted at 19:21:56
- こんな勉強会に参加してました:(108) 2012/05/25(金) アジャイルサムライ読書会 横浜道場 特別編 「アジャイル開発 基本のキ」 に参加してきた #agilesamurai #横浜道場 http://t.co/FhhHwIp2 posted at 16:21:53
- こんな勉強会に参加してました:(023) 2011/06/11(土) 『ADC MEETUP ROUND 01 モバイルを攻略せよ』に参加してきた http://t.co/4CPGkbU4 posted at 13:21:50
- こんな勉強会に参加してました:(056) 2011/10/19(水) Scrum Gathering Tokyo 2011:Day1 に参加してきた #sgt2011 http://t.co/T4DvbYas posted at 10:21:48
- こんな勉強会に参加してました:(027) 2011/06/23(木) 『DevLOVE 我々は、現場から学ぶ。 〜パターンマイニングの実践〜』に参加してきた #devlove http://t.co/A6DTFtEx posted at 07:21:45
- こんな勉強会に参加してました:(083) 2012/02/16(木) Developers Summit 2012 Day1に参加してきた #devsumi http://t.co/IE2F5D0E posted at 04:21:43
- Play1.2でも導入してみたいのだが同じ仕組みで行けるのかな?参考にして試してみよう。 / “Play Framework(Scala)にTwitter Bootstrap(LESS)を組み込む - Ari-Press” http://t.co/7X9pcqmY posted at 03:11:32
- こんな勉強会に参加してました:(051) 2011/10/08(土) 第13回Yokohama.rbに参加してきた #yokohamarb http://t.co/Xv3EDBPs posted at 01:21:40
- 「ライムスター宇多丸のウィークエンドシャッフル 2013/01/26放送分のつぶやき #utamaru」をトゥギャりました。 http://t.co/Ki7QDyAC posted at 01:14:22


