Ext GWT Eclipse環境構築
先日のGWT(Google Web Toolkit)に続き、GXT(Ext GWT)の方も環境構築から始めてみる。
以前買った書籍及び公式の情報を元に進めて行きたいと思います。

Developing with Ext GWT: Enterprise RIA Development (FirstPress)
- 作者: Grant Slender
- 出版社/メーカー: Apress
- 発売日: 2009/05/12
- メディア: ペーパーバック
- クリック: 13回
- この商品を含むブログ (3件) を見る
- 以下の公式サイトからアーカイブファイルを入手。2010/08/19パブリックリリース最新はgxt-2.1.1-gwt2.zip(20.1MB)。アーカイブファイルを解凍した中に存在するgxt.jar及びresourcesフォルダ配下のファイルを後で使います。
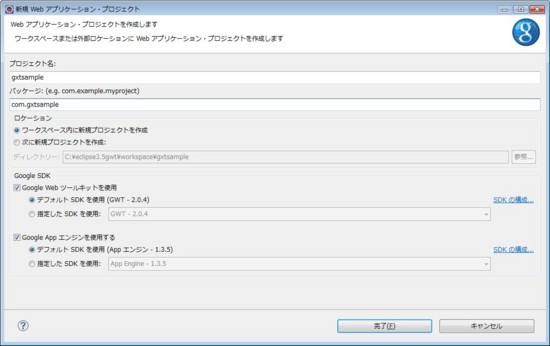
- Eclipseを起動し、任意の[新規Webアプリケーション・プロジェクト]を作成。
- gxt.jarファイルを[対象プロジェクト/war/WEB-INF/lib]配下にコピー。ファイルを右クリック後[ビルドパス]→[ビルドパスに追加]を選択。
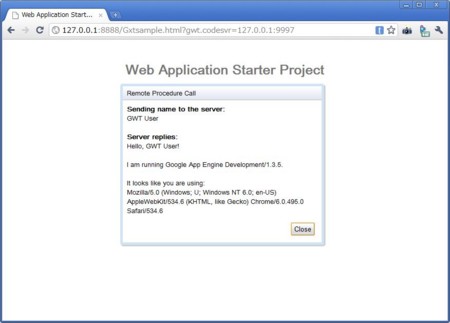
- ひとまずアプリ起動。プロジェクトを右クリック→デバッグ/実行でサンプルアプリが動く事を確認。
- アプリを一旦止めて、ここからGXT対応の実装。モジュールファイル(*****.gxt.xml)を以下の内容に書き換え。
<?xml version="1.0" encoding="UTF-8"?>
<module rename-to='gxtsample'>
  <!-- Inherit the core Web Toolkit stuff.                        -->
  <inherits name='com.extjs.gxt.ui.GXT'/>
  <!-- Specify the app entry point class.                         -->
  <entry-point class='com.gxtsample.client.Gxtsample'/>
</module>
- HTMLファイル(/war/*****.html)を以下の内容に変更。
<! DOCTYPE HTML PUBLIC "-//W3C//DTD HTML 4.01 Transitional//EN">
<!-- The DOCTYPE declaration above will set the    -->
<!-- browser's rendering engine into               -->
<!-- "Standards Mode". Replacing this declaration  -->
<!-- with a "Quirks Mode" doctype may lead to some -->
<!-- differences in layout.                        -->

<html>
  <head>
    <meta http-equiv="content-type" content="text/html; charset=UTF-8">

    <!--                                                               -->
    <!-- Consider inlining CSS to reduce the number of requested files -->
    <!--                                                               -->
    <link type="text/css" rel="stylesheet" href="Gxtsample.css">
    <link type="text/css" rel="stylesheet" href="css/gxt-all.css">

    <!--                                           -->
    <!-- Any title is fine                         -->
    <!--                                           -->
    <title>MyApp GXT</title>

    <!--                                           -->
    <!-- This script loads your compiled module.   -->
    <!-- If you add any GWT meta tags, they must   -->
    <!-- be added before this line.                -->
    <!--                                           -->
    <script type="text/javascript" language="javascript" src="gxtsample/gxtsample.nocache.js"></script>
  </head>

  <!--                                           -->
  <!-- The body can have arbitrary html, or      -->
  <!-- you can leave the body empty if you want  -->
  <!-- to create a completely dynamic UI.        -->
  <!--                                           -->
  <body>

    <!-- OPTIONAL: include this if you want history support -->
    <iframe src="javascript:''" id="__gwt_historyFrame" tabIndex='-1' style="position:absolute;width:0;height:0;border:0"></iframe>

  </body>
</html>
- リソースのコピーを行う。gxtアーカイブファイルを解凍した中身のgxt-2.1.1/resources 配下のコンテンツをプロジェクトのwarフォルダ配下に全てコピー。
package com.gxtsample.client;

import com.extjs.gxt.ui.client.event.ButtonEvent;
import com.extjs.gxt.ui.client.event.SelectionListener;
import com.extjs.gxt.ui.client.widget.MessageBox;
import com.extjs.gxt.ui.client.widget.button.Button;
import com.google.gwt.core.client.EntryPoint;
import com.google.gwt.user.client.ui.RootPanel;

/**
 * Entry point classes define <code>onModuleLoad()</code>.
 */
public class Gxtsample implements EntryPoint {

	/**
	 * This is the entry point method.
	 */
	public void onModuleLoad() {
		Button button = new Button("Click me...");
		button.addSelectionListener(new SelectionListener<ButtonEvent>() {
			@Override
			public void componentSelected(ButtonEvent ce) {
				MessageBox.alert(
					"ボタンを押しました.",
					"You Pressed the Button",
					null);
			}
		});
		RootPanel.get().add(button);
	}
}
- プロジェクトをコンパイル→起動。ブラウザでアクセスし、見た目及び稼働を確認。
以上、ざっくりとではありますが環境構築・初期動作確認でした。GXTライブラリを追加する件は、書籍ではプロジェクト設定:[Java]→[ユーザー・ライブラリ]で変数として(gxtライブラリの場所を)追加、設定していましたが、上記の設定内容でも問題無しでした。(あればその時に対応)


